Installation Instructions
- Download the package from the Unity Asset Store.
- Open Unity, and import the package (
Assets>Import Package>Custom Package). - Select the downloaded package file to add it to your project.
Basic Usage
After importing Inspector Enhancements into your project, add InspectorEnhancements to your script:
using InspectorEnhancements;
And you can start applying attributes to your fields or methods:
[MethodButton]
public void MyMethod() { /* ... */ }
Collection Dropdown
Overview
The [CollectionDropdown] attribute allows you to display a dropdown selection in the Unity Inspector for a non-collection field, with options populated from a collection (such as an array or list) or a method that returns a collection. This attribute helps select from predefined options in the Inspector, making field assignment more organized and user-friendly.
Capabilities
The [CollectionDropdown] attribute supports the following capabilities:
- Supported Field Types: Can be applied to fields of types such as
string,int, and other primitive types, as well as custom serializable classes. - Supported Collections: The dropdown options can be populated from any collection that implements
IEnumerable, such as arrays, lists, or even results from methods returningIEnumerable. - Method Support: You can use parameterless methods or methods with parameters to dynamically generate the collection for the dropdown options.
- Dynamic Parameter Passing: For methods with parameters,
[CollectionDropdown]allows you to specify values for each parameter, providing flexibility in generating collections based on input values.
Syntax and Examples
Note: These examples use Unity’s
[SerializeField]onprivatefields to promote encapsulation. This approach can help protect internal data from unintended access by other scripts and maintain clean, organized code. For more details, see Unity’s documentation on SerializeField.
Applying [CollectionDropdown] is straightforward. You specify the name of a collection field or method as a string in the attribute. Here’s a breakdown of the different ways to use it.
Basic Syntax
[CollectionDropdown("collectionOrMethodName")]
[SerializeField]
private FieldType fieldName;
Additional Constructor Syntax
// Using a method with parameters
[CollectionDropdown("memberName", param1, param2, ...)]
Example 1: Using with a Field Reference
In this example, selectedColor is a string field that allows you to select from a predefined array of color names.
[CollectionDropdown("colors")]
[SerializeField]
private string selectedColor;

private string[] colors = { "Red", "Blue", "Green", "Yellow", "Purple", "Orange" };
Result: In the Inspector, selectedColor will display a dropdown with the values from colors, allowing easy selection from the predefined list.

Example 2: Using with a Parameterless Method
Here, spawnPoint is a Vector3 field that allows selection from dynamically generated spawn points by calling a parameterless method GetSpawnPoints.
[CollectionDropdown("GetSpawnPoints")]
[SerializeField]
private Vector3 spawnPoint;

private List<Vector3> GetSpawnPoints()
{
    // Generate or retrieve a list of spawn points
    return new List<Vector3> { new Vector3(0, 4, 2), new Vector3(5, 2, 27), new Vector3(8, 2, 5) };
}
Result: The dropdown for spawnPoint in the Inspector will display the items returned by GetSpawnPoints.

Example 3: Using with a Method with Parameters
In cases where you want to generate options based on specific parameters, [CollectionDropdown] can also work with methods that accept arguments. Here, selectedLevel allows selecting a level from a generated range of integers.
[CollectionDropdown("GetLevelRange", 1, 10)]
[SerializeField]
private int selectedLevel;

private int[] GetLevelRange(int start, int end)
{
    // Generate a range of levels
    return Enumerable.Range(start, end - start + 1).ToArray();
}
Result: In the Inspector, selectedLevel will show a dropdown with integers from 1 to 10, as specified in the [CollectionDropdown] attribute.

HideIf & ShowIf
Overview
The [HideIf] and [ShowIf] attributes conditionally hide or show fields in the Unity Inspector based on specific conditions. They are useful for creating dynamic Inspector layouts, allowing certain fields to be visible only when specific conditions are met.
- HideIf: Hides a field when the specified condition is
true. - ShowIf: Shows a field when the specified condition is
true.
Capabilities
The [HideIf] and [ShowIf] attributes support the following capabilities:
- Boolean Field Conditions: Conditions based on a
boolfield in the class. - Method Conditions: Supports conditions based on a method that returns a
bool. - Method Parameters: Allows passing parameters to methods referenced in the attribute.
Syntax and Examples
Note: These examples use Unity’s
[SerializeField]onprivatefields to promote encapsulation. This approach can help protect internal data from unintended access by other scripts and maintain clean, organized code. For more details, see Unity’s documentation on SerializeField.
Applying [HideIf] or [ShowIf] is straightforward. Specify the name of a bool field or a method that returns bool in the attribute.
Basic Syntax
[SerializeField]
[HideIf("conditionName")]
private FieldType fieldName;

[SerializeField]
[ShowIf("conditionName")]
private FieldType fieldName;
Additional Constructor Syntax
// Using a method with parameters to control visibility
[HideIf("methodName", param1, param2, ...)]
Example 1: Hiding a Field Based on a Boolean Field
In this example, hiddenField will be hidden in the Inspector when the shouldHide boolean field is true.
[SerializeField]
private bool shouldHide;

[SerializeField]
[HideIf("shouldHide")]
private int hiddenField = 20;
Result: When shouldHide is true, hiddenField will be hidden in the Inspector. When shouldHide is false, hiddenField will be visible.

Example 2: Showing a Field Based on a Method Condition
Here, showFieldMethod is shown based on the result of a method, ReturnShouldShow, which returns a boolean value.
[SerializeField]
private int number = 10;

[SerializeField]
[ShowIf("ReturnShouldShow")]
private string showFieldMethod = "Visible when condition is met";

private bool ReturnShouldShow() {
    return number >= 5;
}
Result: showFieldMethod will be shown when ReturnShouldShow returns true and hidden when it returns false.

Example 3: Using Method Parameters for Conditional Visibility
In this example, conditionalField is hidden based on the result of a method, CheckCondition, that takes a bool parameter.
[SerializeField]
private bool shouldHide;

[SerializeField]
[HideIf("CheckCondition", "shouldHide")]
private int conditionalField = 30;

private bool CheckCondition(bool parameter)
{
    return parameter;
}
Result: conditionalField will be hidden if CheckCondition returns true based on the value of shouldHide. When shouldHide is false, conditionalField will be visible.

Example 4: Combining HideIf and ShowIf for Complex Conditions
This example combines [HideIf] and [ShowIf] on combinedField to control its visibility based on both shouldHide and shouldShow conditions. The field will only be visible if shouldShow is true and shouldHide is false.
[SerializeField]
private bool shouldHide;
[SerializeField]
private bool shouldShow;

[SerializeField]
[HideIf("shouldHide"), ShowIf("shouldShow")]
private string combinedField = "Conditionally Visible";
Result: combinedField will be visible only when shouldShow is true and shouldHide is false. If shouldHide is true or shouldShow is false, the field will be hidden.

HideLabel
Overview
The [HideLabel] attribute is a simple attribute that removes the label of a field in the Unity Inspector. The attribute is useful when the label itself doesn’t add much context or when dealing with inspector elements that benefit from a streamlined display.
Syntax and Examples
Note: These examples use Unity’s
[SerializeField]onprivatefields to promote encapsulation. This approach can help protect internal data from unintended access by other scripts and maintain clean, organized code. For more details, see Unity’s documentation on SerializeField.
Using [HideLabel] is straightforward. Simply apply the attribute above the field you want to display without a label.
Basic Syntax
[HideLabel]
[SerializeField]
private int valueWithoutLabel;
Example 1: Applying to a Primitive Field
Let’s say you want to display a float without a label, for instance, as a transparency or scale factor where the field’s purpose is clear without an additional label.
[HideLabel]
[SerializeField]
private float transparency;
Result: In the Inspector, this field will display only the float input box without a label, making it more visually streamlined.

Example 2: Using with Unity Native Types
You can also apply [HideLabel] to native Unity types like Color to hide the label, useful when the color picker speaks for itself.
[HideLabel]
[SerializeField]
private Color mainColor;
Result: The Color field will show only the color picker without the label, creating a minimalistic and user-friendly look.

Inline Property
Overview
The [InlineProperty] attribute inlines the fields of a serializable class or struct, displaying them directly within the Inspector instead of requiring a nested view. This attribute allows for organized, inline data display, making it easier to manage complex data structures within the Inspector. The attribute can be applied at both the class/struct level and individual field level, with field-level decoration taking precedence.
Capabilities
The [InlineProperty] attribute supports the following capabilities:
- Class/Struct and Field-Level Decoration:
- When applied to a class or struct,
[InlineProperty]allows all instances of that type to be displayed inline. - To display a specific field inline, the field itself must also be decorated with
[InlineProperty], which takes precedence over the class-level attribute. This approach enables flexible configuration for both the entire type and individual instances.
- When applied to a class or struct,
- Custom Naming Modes: Offers different naming modes to adjust how fields are displayed inline:
- HeaderName: Displays a header for the inline property.
- PrependName: Prepends the field name to each inline field, useful when multiple instances of the same type are displayed inline.
- Default (No Naming): Displays inline fields without additional headers or prefixes.
- Supported Field Types: Compatible with various field types within the struct or class, including primitive types,
UnityEnginetypes (e.g.,Vector3,Color), and custom serializable classes or structs.
Syntax and Examples
Note: These examples use Unity’s
[SerializeField]onprivatefields to promote encapsulation. This approach can help protect internal data from unintended access by other scripts and maintain clean, organized code. For more details, see Unity’s documentation on SerializeField.
Basic Syntax
[InlineProperty]
[SerializeField]
private MyCustomStruct inlineStruct;
Additional Constructor Syntax
// Specifying display mode (None, PrependName, or HeaderName)
[InlineProperty(InlinePropertyNameMode.PrependName)]

// Specifying a custom header name
[InlineProperty("Custom Header")]

// Specifying both display mode and custom header
[InlineProperty(InlinePropertyNameMode.PrependName, "Custom Header")]

// Specifying custom header and display mode, with arguments reversed
[InlineProperty("Custom Header", InlinePropertyNameMode.PrependName)]
Example 1: Decorating the Class with Custom Naming Mode, Overwritten at Field Level
In this example, [InlineProperty] is applied both at the TestStruct struct level with a custom header and at specific fields. The field-level decorations overwrite the default behavior defined at the struct level.
[System.Serializable]
[InlineProperty(InlinePropertyNameMode.HeaderName, "Custom Struct Header")]
public struct TestStruct
{
    public int intField;
    public float floatField;
    public Vector3 vectorField;
}

// Field-level override with `PrependName` mode
[InlineProperty(InlinePropertyNameMode.PrependName)]
[SerializeField]
private TestStruct structWithPrepend;
Result: The Inspector displays structWithPrepend inline, with each field name prefixed with “structWithPrepend_”. The header “Custom Struct Header” from the struct-level attribute is not applied here because the field-level [InlineProperty] attribute overrides it.

Example 2: Applying Inline Property at Both the Class and Field Level with Default Behavior
Here, the individual field referencing this class uses [InlineProperty], ensuring the fields appear inline in the Inspector, even though the class is not decorated.
[System.Serializable]
public class TestClass
{
    public bool boolField;
    public Quaternion quaternionField;
}

[InlineProperty]
[SerializeField]
private TestClass defaultClass;
Result: The defaultClass fields appear directly in the Inspector without any additional labels or headers, providing a clean and organized view.

Example 3: Using Class-Level Header with Field-Level Reference
In this example, the struct TestStruct is decorated with [InlineProperty] at the struct level, specifying a custom header. The field structWithHeader references TestStruct but does not provide any parameters, allowing it to inherit the header defined at the struct level.
[System.Serializable]
[InlineProperty(InlinePropertyNameMode.HeaderName, "Custom Struct Header")]
public struct TestStruct
{
    public int intField;
    public float floatField;
    public Vector3 vectorField;
}

[InlineProperty]
[SerializeField]
private TestStruct structWithHeader;
Result: The Inspector displays structWithHeader inline, using the “Custom Struct Header” specified at the struct level. Each field within TestStruct (intField, floatField, and vectorField) is displayed directly in the Inspector under this header without additional prefixes or labels, since no parameters were specified at the field level to override the struct’s configuration.

Method Button
Overview
The [MethodButton] attribute enables direct method invocation from the Unity Inspector. This attribute is useful for testing methods directly within the inspector, making it handy for debugging, prototyping, or triggering certain actions both inside and outside of Play mode.
Capabilities
The [MethodButton] attribute supports the following capabilities:
- Parameterized Methods: Methods with parameters can also be used, allowing you to specify default values in the
[MethodButton]attribute. - Parameterless Method Support: Works with methods that do not require parameters.
- Supported Parameter Types: Compatible with primitive types (e.g.,
int,float,bool), Unity native types (e.g.,Vector3,GameObject), and custom serializable classes. - Dynamic Field Referencing: Enables you to reference other serialized fields as parameters.
Syntax and Examples
Note: These examples use Unity’s
[SerializeField]onprivatefields to promote encapsulation. This approach can help protect internal data from unintended access by other scripts and maintain clean, organized code. For more details, see Unity’s documentation on SerializeField.
Applying [MethodButton] is straightforward. Add the attribute above the method you want to be accessible in the Inspector, and specify any parameters or field references as needed.
Basic Syntax
[MethodButton]
public void MethodName()
{
    // Method code here
}
Additional Constructor Syntax
// Set parameter expansion state
[MethodButton(false)]

// Method with specific parameters
[MethodButton(param1, param2, ...)]

// Method with parameter expansion state and specific parameters
[MethodButton(false, param1, param2, ...)]
Example 1: Using a Parameterless Method
In this example, LogMessage is a parameterless method that will display a message in the Console when invoked from the Inspector.
[MethodButton]
public void LogMessage()
{
    Debug.Log("Button clicked!");
}
Result: In the Inspector, a button labeled “Log Message” will appear, allowing you to trigger LogMessage by clicking the button.

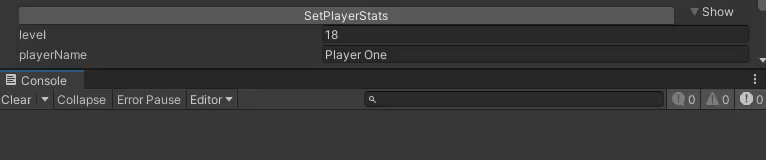
Example 2: Using a Method with Parameters (Inspector-Generated Inputs)
Here, SetPlayerStats is a method that requires an integer and a string as parameters. When [MethodButton] is applied to a method with parameters, Unity will automatically generate input fields for those parameters in the Inspector.
[MethodButton]
public void SetPlayerStats(int level, string playerName)
{
    Debug.Log($"Setting player stats: Level - {level}, Name - {playerName}");
}
Result: A button labeled “Set Player Stats” will appear in the Inspector, accompanied by input fields for the level and playerName parameters. You can enter values directly into these fields before pressing the button to invoke the method.
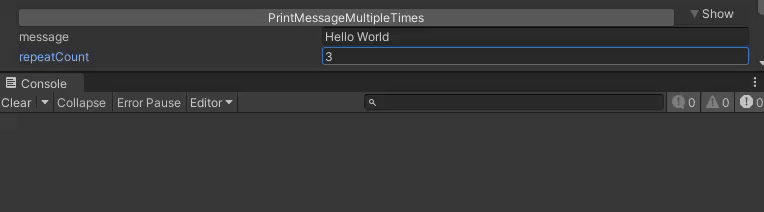
Example 3: Using a Method with Parameters and Default Values
This example demonstrates a method PrintMessageMultipleTimes that takes a string message and an int specifying how many times the message should be printed. By specifying default values in [MethodButton], you set defaults for the parameters directly in the attribute.
[MethodButton("Hello World", 3)]
public void PrintMessageMultipleTimes(string message, int repeatCount)
{
    for (int i = 0; i < repeatCount; i++)
    {
        Debug.Log(message);
    }
}
Result: A button labeled “Print Message Multiple Times” will appear in the Inspector, and when clicked, it will print “Hello World” three times to the Console by default.
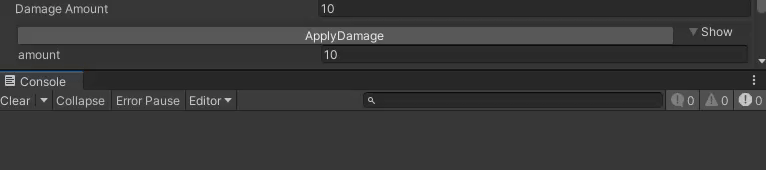
Example 4: Using a Method with Field References as Parameters
In this example, ApplyDamage accepts a damage amount, which can be provided by referencing another serialized field (damageAmount) as the parameter.
[SerializeField]
private int damageAmount = 10;

[MethodButton("damageAmount")]
public void ApplyDamage(int amount)
{
    health -= amount;
    Debug.Log($"Damage applied: {amount}");
}
Result: A button labeled “Apply Damage” will appear in the Inspector. When clicked, it will execute ApplyDamage using the current value of damageAmount.
Required
Overview
The [Required] attribute helps ensure that a field is not left as null in the Unity Inspector, helping prevent common runtime errors by prompting the user to assign a value. When applied, the Inspector will display a warning if the field is left empty, alerting the developer to assign a value.
This attribute is particularly useful for references to GameObjects, Components, and other objects that are essential for the script’s functionality, reducing the risk of errors due to missing assignments.
Syntax and Examples
Note: These examples use Unity’s
[SerializeField]onprivatefields to promote encapsulation. This approach can help protect internal data from unintended access by other scripts and maintain clean, organized code. For more details, see Unity’s documentation on SerializeField.
Using [Required] is straightforward. Simply apply the attribute above the field you want to enforce as non-null.
Basic Syntax
[Required]
[SerializeField]
private GameObject importantObject;
Additional Constructor Syntax
// Custom error message
[Required("Custom error message")]
Example 1: Ensuring a GameObject Reference
In this example, importantObject is a GameObject that must be assigned for the script to function correctly.
[Required]
[SerializeField]
private GameObject importantObject;
Result: In the Inspector, a warning will appear if importantObject is left unassigned, prompting you to assign a value.

Example 2: Enforcing a Required Component Reference
You can also use [Required] with specific component references, such as Rigidbody, to ensure they are assigned before runtime, and specify a custom error message to be displayed if not set.
[Required("Custom Error Message")]
[SerializeField]
private Rigidbody playerRigidbody;
Result: If playerRigidbody is left unassigned in the Inspector, a warning will alert you, saying “Custom Error Message”, until a Rigidbody reference has been assigned, preventing potential runtime errors.

Inspector Enhancements
Inspector Enhancements is a Unity package offering custom drawers and property attributes to enhance the Unity Inspector experience. This collection of utility attributes improves data visualization, organization, and validation in the editor.
Now on the Unity Asset Store!
Features
Method Button Attribute
The [MethodButton] attribute enables direct method invocation from the Unity Inspector, working seamlessly with both parameterless methods and methods that require parameters.
- Capabilities:
- Functions with methods regardless of whether they have parameters or not, requiring no additional setup.
- Displays default values in the Inspector for parameters specified in the attribute or defined as default values in the method itself.
- Supports referencing other serialized fields as parameters by specifying their names.
- Compatible with primitive types, Unity native types (e.g.,
Vector3,GameObject), and custom serializable classes/structs.
Collection Dropdown Attribute
The [CollectionDropdown] attribute displays a dropdown for selecting items within a collection directly in the Inspector. Compatible with standard collections such as arrays and lists, this feature enhances Inspector usability by allowing streamlined access to collection elements.
- Capabilities:
- Provides a dropdown selection for array, list, and similar collection fields, offering an organized and user-friendly way to view and choose items.
- Supports any collection type that implements
IEnumerable, making it flexible for various use cases in the Inspector.
HideIf / ShowIf Attributes
The [HideIf] and [ShowIf] attributes allow conditional visibility of specific fields in the Inspector. They can be configured to dynamically hide or display fields based on certain conditions, enhancing data organization and readability.
-
Capabilities:
- Supports
boolfields and methods that returnboolvalues. - Accepts parameters if a method is provided, enabling custom logic.
- Can operate without parameters, hiding or showing based on the field’s null status.
- Supports
-
Limitations: Not compatible with custom structs or classes; supports Unity native objects and primitive types.
HideLabel Attribute
The [HideLabel] attribute simply hides the label of a field in the Inspector. This is useful for a cleaner display, removing labels where they aren’t necessary and simplifying the user interface.
- Capabilities: Provides a cleaner look by removing labels where they aren’t needed, which can simplify the interface.
Inline Property Attribute
The [InlineProperty] attribute inlines a serializable class or struct, displaying it directly within the Inspector. This attribute is particularly useful for visualizing nested data structures, like other classes within a MonoBehaviour, and allows for flexible customization.
- Capabilities:
- Inlines a custom class or struct as a field, showing each associated field directly.
- Allows for custom naming, with optional name prefixing for each field in the inline class.
- Supports customization of both the class setup and individual field display, ideal for organizing nested data within
MonoBehaviourscripts.
Required Attribute
The [Required] attribute ensures that a field cannot be left as null, helping to prevent common runtime errors by flagging fields that require a value assignment.
- Capabilities: Enforces that an object or field must be assigned by displaying a warning if left unfilled.
Here’s the Upcoming Features section updated to display the new attributes in the same manner as the previous ones:
Upcoming Features
ShowInInspector Attribute
The [ShowInInspector] attribute allows non-serialized properties to be displayed and edited directly within the Inspector. This feature is useful for exposing calculated or dynamically generated properties while still maintaining editable fields in the editor.
- Capabilities:
- Displays non-serialized properties directly in the Inspector.
- Allows property editing, updating the backing serialized field if one is referenced, enabling dynamic data management within the editor.
InterfaceImplementation Attribute
The [InterfaceImplementation] attribute displays interface fields in the Inspector, enabling users to select from a list of eligible implementations. This makes it easier to assign specific implementations to an interface directly in the Unity editor.
- Capabilities:
- Shows eligible implementations of an interface in a dropdown list within the Inspector.
- Only non-abstract classes with a default constructor are selectable, excluding
MonoBehaviourtypes and abstract classes. - Simplifies assigning specific implementations to interfaces directly within Unity’s Inspector.